Thursday, February 9, 2017

I found a better way to make HST!!

Hello out there!  Last night I sat down to start making my QAL project for this month.  You see I have been trying to figure out an easier way to make HST (half square triangles) by using a square and not having to worry about stretching the seam because it is on the bias and a triangle. 

Enter an article I remembered reading so I ended up doing a tutorial for you so you can make up the HST lickity split.  And the best part, this way makes 8 using two charm squares!  Here is a pictorial for you, I will explain as I go along.....warning not the greatest pictures, I used my phone and I kept creating shadows...oh well....


Using my handy tool I told you about in my last blog post I drew two sewing lines down the center corner to corner on either side of the tool.
  Did it again from the other corner to make an X
 Next I sewed down ALL THE LINES
 Using my ruler I measure 2 1/2 inches from the center of the square to the end then cut top to bottom, right over the seams.
 Next I cut again down the center of the half cut measuring 2 1/2 inches.
 This left me with 4 squares that measure 2 1/2 incles with two sewing lines corner to corner....next I measured right between those sewing lines and cut to form HST.
 Look at all that wonder!!!!  (the pictures shows two of my blocks ,I was having fun!
 Next here is my placement, cut off the dogears (figuratively NOT literally)
 sew it all together to reveal your square!!! trim up if necessary!  I am sure this quilt is going to go by so fast and probably not so crooked for me from stretching the bias the way it shows to cut it in the book!  Have fun making HST people!!!  Let me know in the comments below if this was helpful and if you tried this method!
See you soon!!!


Wednesday, February 8, 2017

UFO Quilt Projects

I am a lover of things that are pretty.  And I love to flip through a very visually pleasing quiltbook and dream about where I could put some of the quilts in my home.  Which has lead to many, many quilttops.  Not completed to be called a quilt, they are called by quilters UFO's.  Unfinished Obstacles!!!  Although I think some people may call them objects, for me they are obstacles.  I find I can't move on when I have a stack of them staring straight at me!! LOL  Soooo I am trying so hard to complete some in between other projects.  And here is my first one. 


That Quilt on the back of the chair is called Temperance click on the word to see original post.  I made it back in May of 2015 and just finally hand quilted and binded it.  I have to say I love the process of doing it by hand....it is relaxing for me.  I added some lace into the binding to give it a lady look...lol.  Hopefully I will be back even more this year with more completions as time allows.  Heres to a blessed day! 

Friday, February 3, 2017

Product reviews

So recently I stumbled on some really great products that I just had to share them with you.  Let me first say I have not been paid by any of these companies or received these products free.  I have purchased all of them while I was out and about.

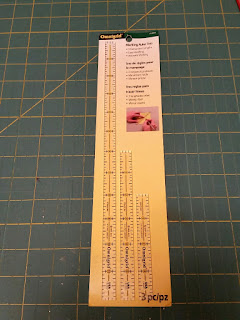
Okay so the very first product I found yesterday while at Joanne Fabric and crafts while shopping with my husband.  The cut counter was sooooo backed up and I had my number I started wandering.  Well I was in the Quilting tool area, hubby was looking at the spring yard items I found this VERY AWESOME TOOL EVERY quilter Must have in the tool caddy.

This is a three Marking Ruler set.


Why do I need this tool you ask?  WELL,  if you need to mark off let's say half square triangles it is perfect.  I have snapped a little tutorial for a visual.


So here I have placed the ruler down the center.  The center line will be the cutting line, to each side is a perfect 1/4" either side


Next I will take my vanishing marker and mark down each side of the ruler


There ya go!  Just sew on the marked lines!  Simple but so awesome!!! These are made by Omnigrid so you know it's quality!!!  Thank you Omnigrid for making a great marking tool!!!


Okay so one day I am scrolling through Facebook and this ad pops up for these vanishing markers, they are called U top Auto Marking Pen.  They are FABULOUS!!!!!!
And now I don't know where to get them but will keep looking, if you find them let me know!!!


Next up by Clover is a 1/4" Bias maker and tape.  Now you put the fabric through to make your bias strip, then you feed the tape  through the top while feeding the fabric through...it sticks to the fabric then you peel back the tapper and iron it onto the project.  Genius!!!


Now the last item, I was watching Fons and Porter on ôur PBS station and they were giving tips at the end of the segment.  One writer wrote in and gave the tip to cut pieces of vinyl, the clear kind to fit around your thread  to keep your thread from unraveling!  I made sure the seam was cover by at least 1" to really get the vinyl to stick....isn't that smart!!!  This is why I was at Joanne's in the first place to buy a small piece of vinyl and found the marking tool!!  LOL. It pays to wander!  So that is my two cents.  Hope you have luck finding these products!  Until next time.
( sorry I got the last two photos backwards, the top one of the thread is the finished product, my iPad won't let me change it unless I rewrite this entire post.)


Hello!!!!!

Oh my goodness its been OVER a year!!  WHAT???? What happened?  Hmmmmm Facebook, Instagram and just plain life. I guess you can say I took...